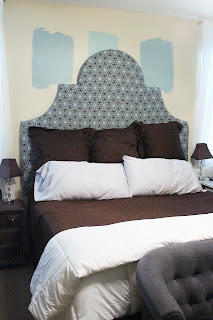
We finally got the master bedroom headboard completed. (We started on the project in February after I couldn't stand the ouch-y headboard any longer.) I had the Dwell Studio fabric purchased even before then because I loved it. We based most of our doings on this tutorial. A carpenter friend cut out the shape for us from our re-sized (we have a King bed instead of a queen that was in the tutorial) template. We attached the two pieces with 3 long metal strips and short screws.
Next we attached high density foam to the wood with spray adhesive. We then cut it to fit using an electric bread knife. (Note: If you wanted to do this project, the high density foam is unnecessary to the feel of the final product. Use some cheaper 2" foam and save some moolah.)
Finally the day came when I got up the guts to sew a perfect seam (we needed a lot of fabric for the hugeness I desired) and cover the headboard. Covering it was tricky because of the geometric nature of the fabric and my perfectionistic tendencies - lines must be straight. I ended up doing a couple pleats in the fabric at the bottom of the semicircle. It was quite the adventure. If I had it to do over again, I would either pick a different fabric or sew a slipcover for the entire shape and just have a seam on the edge. But, this worked and looks great!
Since we didn't want it to stick out very far from the wall, Jason ordered a really long, narrow, metal french cleat. We attached it to the drywall with drywall anchors and it is solid.
We are loving the comfort of the new headboard and the grand statement it makes. Now I just have to get up the gumption to paint (We decided on the center swatch of color in these pictures.) sew some pillows with a coordinating fabric I already own from the same line, and make curtains for the bathroom. Oh, and I also want a new accent (ie: reading) chair for the corner of the room. Wow, it doesn't sound like I am close at all.
Our other project was an Ikea hack. We had purchased this storage system for behind the couch to house the girls' stuff and keep things looking neat, but I didn't like the basket options. So, we customized. It took us a while, but we found two fabrics (outdoor fabrics for durability) that worked with both the kitchen and the family room.
I first cut the fabric to fit the front of the boxes exactly on the width and 1/2 inch too long to tuck under the pull tab. Then Jason put fray check around every edge of the cut pieces - protect your counter as this stuff is like superglue. Then I ironed on adhesive to each piece, removed the excess and the backing. We positioned the pieces exactly (tucking under the top pull strip) and ironed them directly onto the fabric of the boxes.
I love how much more custom, fun, and warm it looks! It also looks cleaner because of the better quality fabric and the pattern. It's been over a month now and they are holding up perfectly. It was a simple and inexpensive upgrade that made a big impact.


It has been really nice and a lot of fun to have made such great progress on the house. Hooray! And it looks FANTASTIC!!!!
ReplyDeleteWow!!! I love the headboard. Thanks for the tips. And the update to the storage is so cute!!! I love the fabric!! Way to go!!!
ReplyDeleteYou are so clever....great job Melinda!
ReplyDeleteYou are so crafty and creative! I love the storage and should totally do something like that for my living room!
ReplyDelete